现在为我们的项目添加推送功能有两种方式
1:使用Token Authentication (p8)方式,也是现在推荐的方式 Token Authentication (p8)是 APNs 新推出的推送鉴权方式,这种新的方式有很多优势
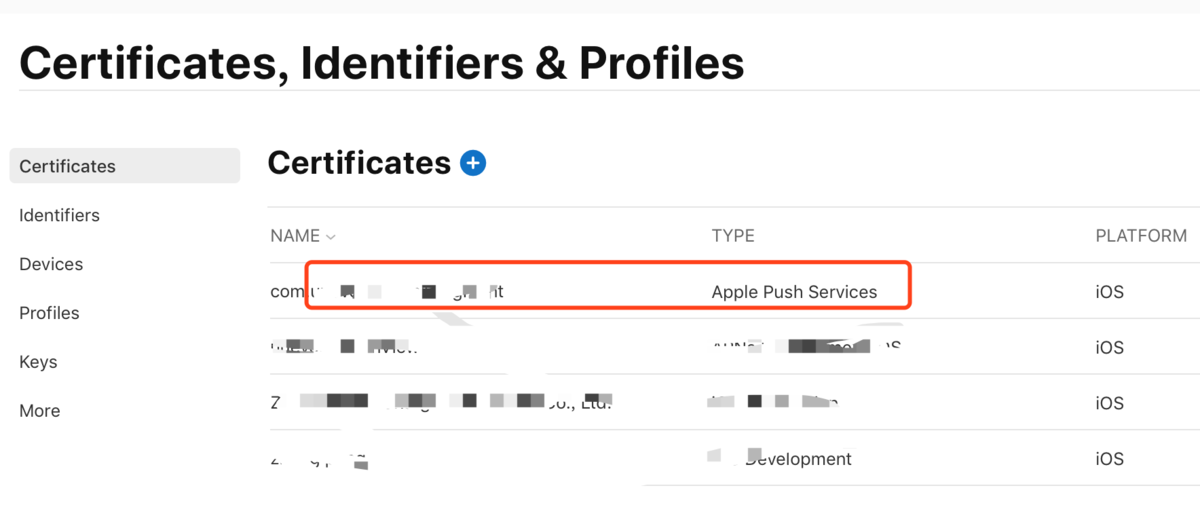
同一个账户下所有 App 无论是测试 App 还是正式版 App,都能使用同一个 key 来发推送消息和 voice-over-Internet Protocol (VoIP) 消息,不再需要为每个 App 生成一个证书
生成的 Auth Key 不再有过期时间,无需像证书那样每年需要重新生成一次
生成过程简单,不需要繁琐、易错的证书导出操作
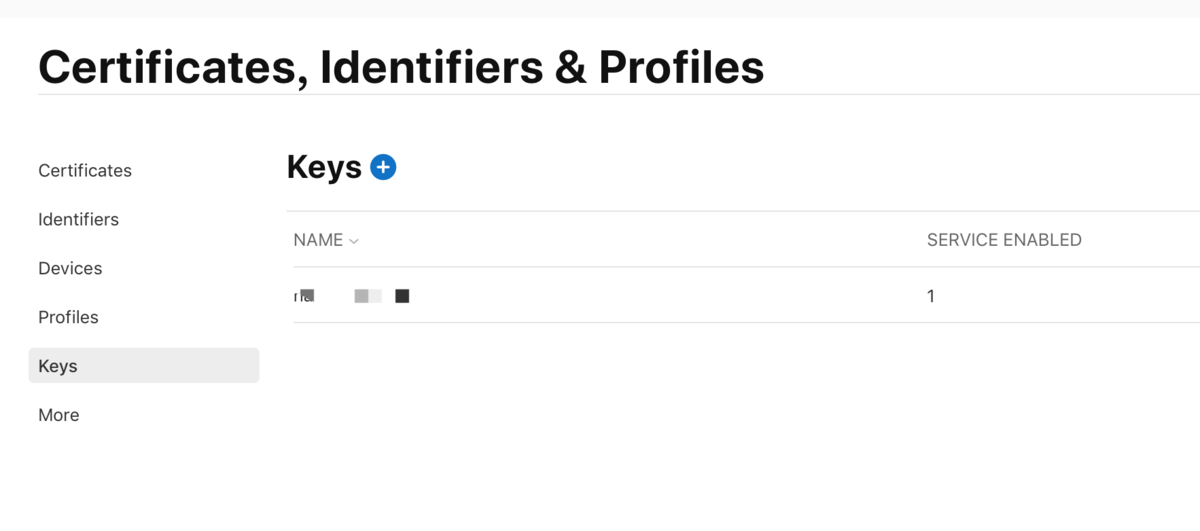
创建Token Authentication (p8)
点击keys旁边的添加,然后我们勾选图中的选择,点击continue
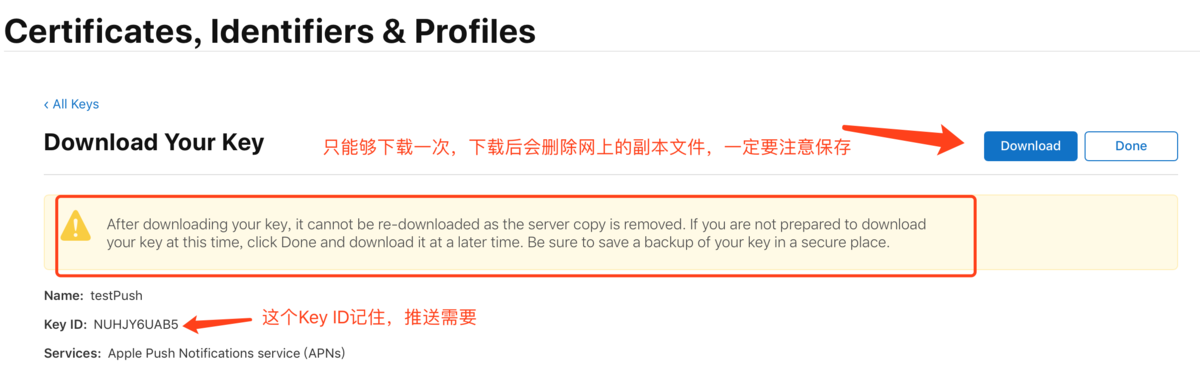
下载后会有一个.p8文件,AuthKey_keyxxxxx.p8
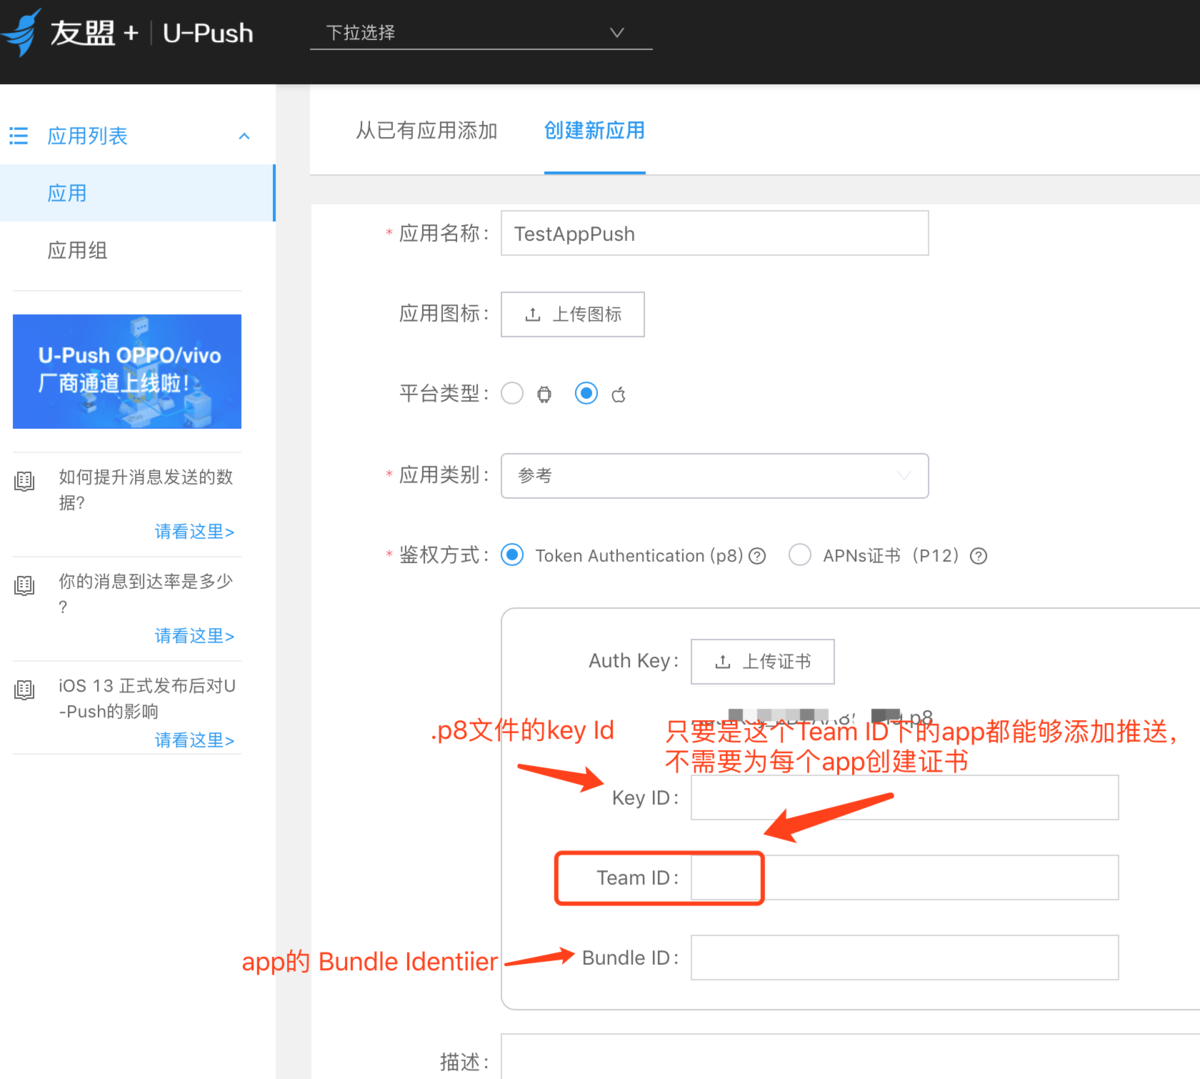
如果我们使用第三方推送,比如友盟,个推等,我们还需要Team ID
这里以友盟推送示列,我们去友盟上配置一下,最后点击确认添加,如果不出意外,添加成功
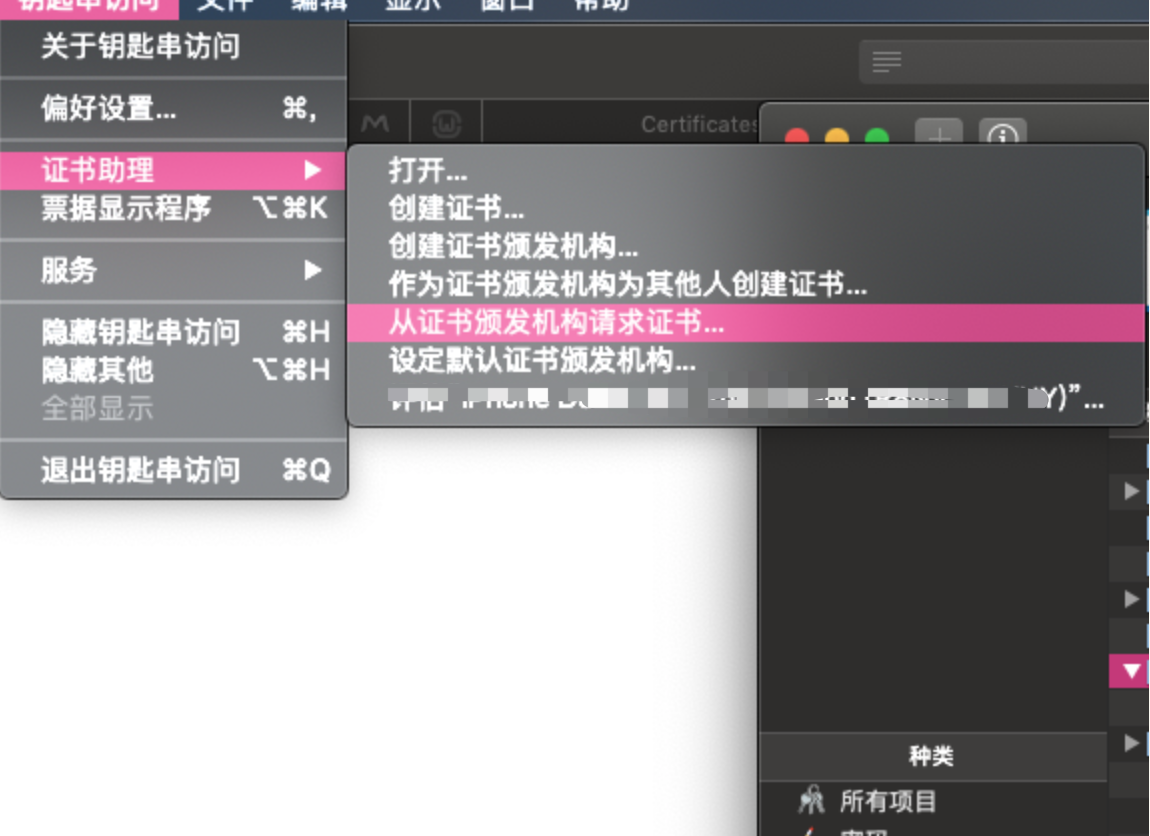
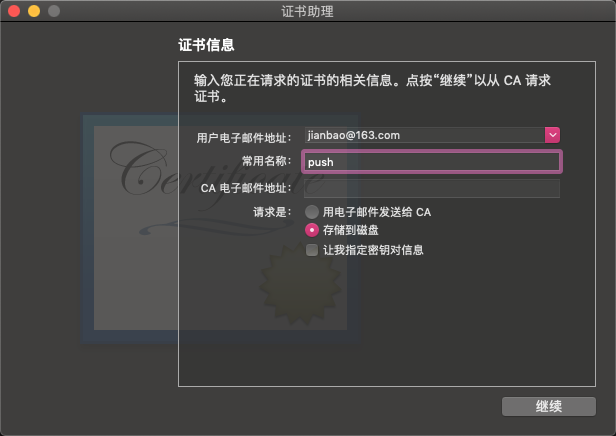
2:使用证书的方式来添加消息推送 1:从CA请求证书
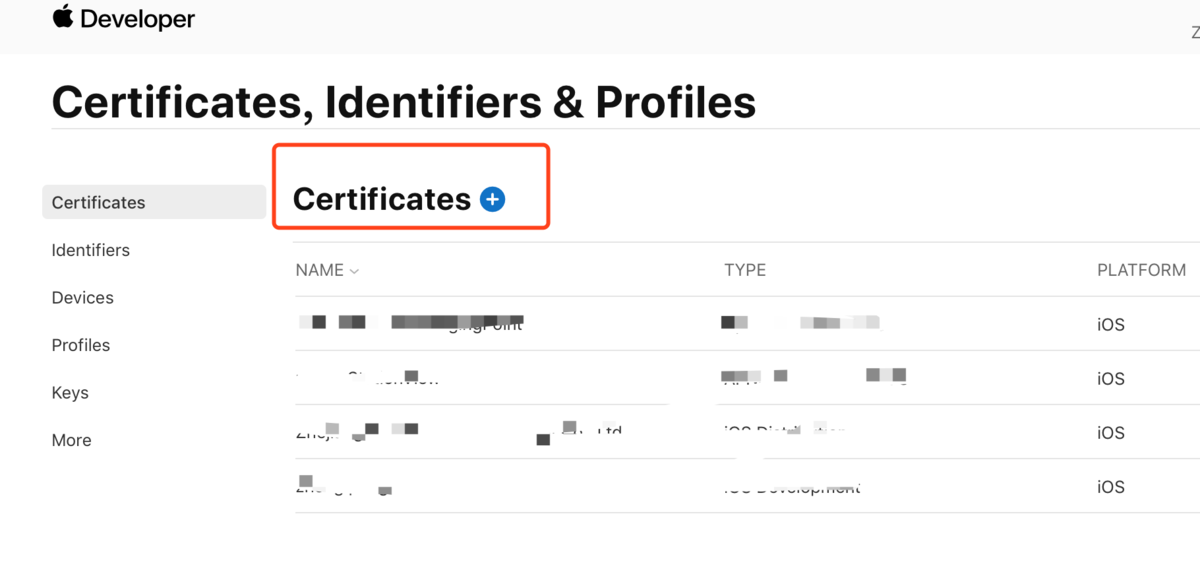
2:苹果开发者网站创建推送证书,点击+号
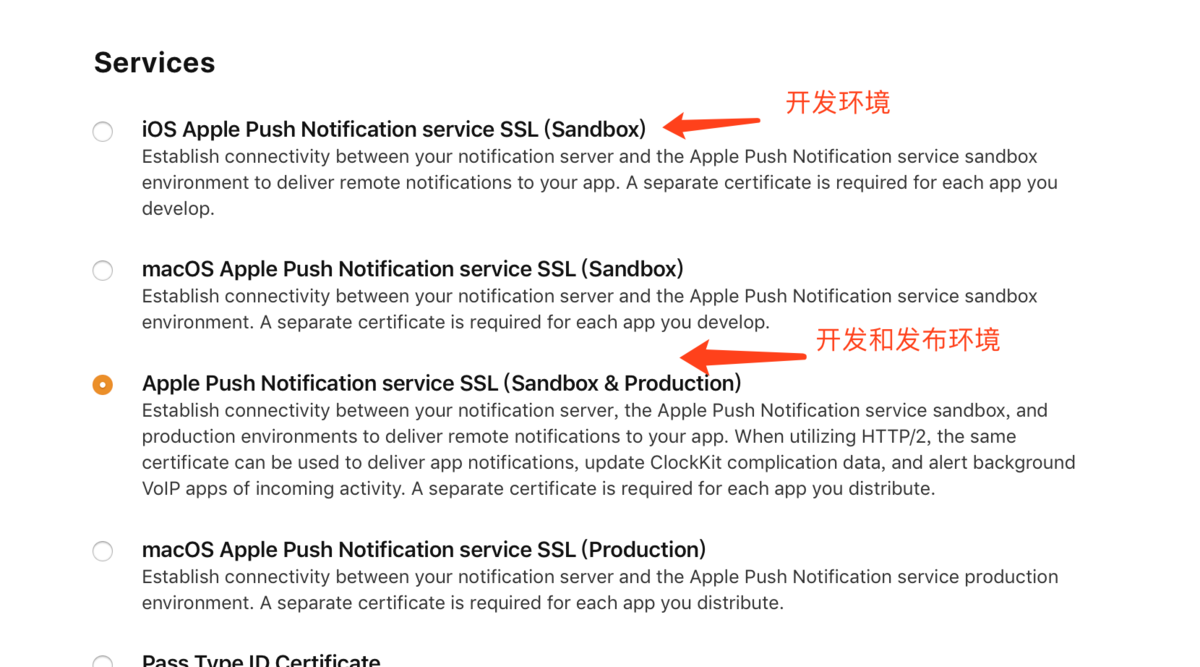
我们创建开发和发布环境都支持的证书
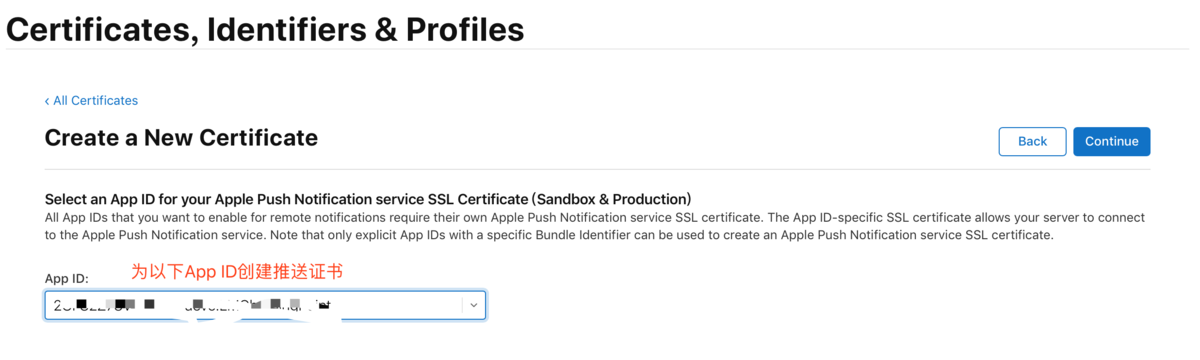
选择我们要创建推送证书的App ID,绑定证书与App的关系,这个App就可以实现消息推送功能
选择刚刚创建的CA证书
创建成功,下载证书,并添加到钥匙串中
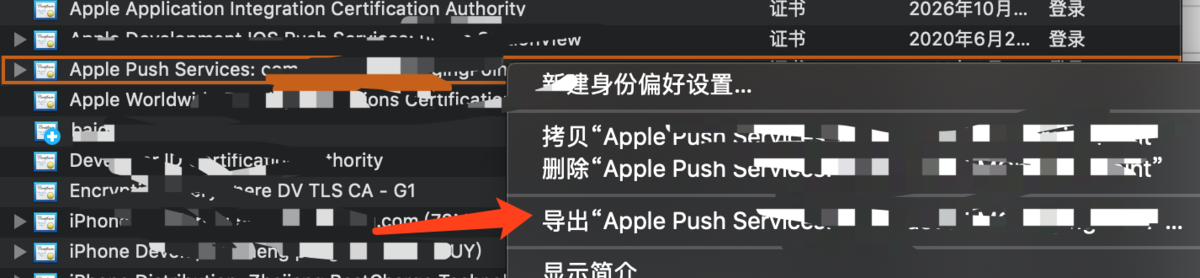
导出.p12文件备用
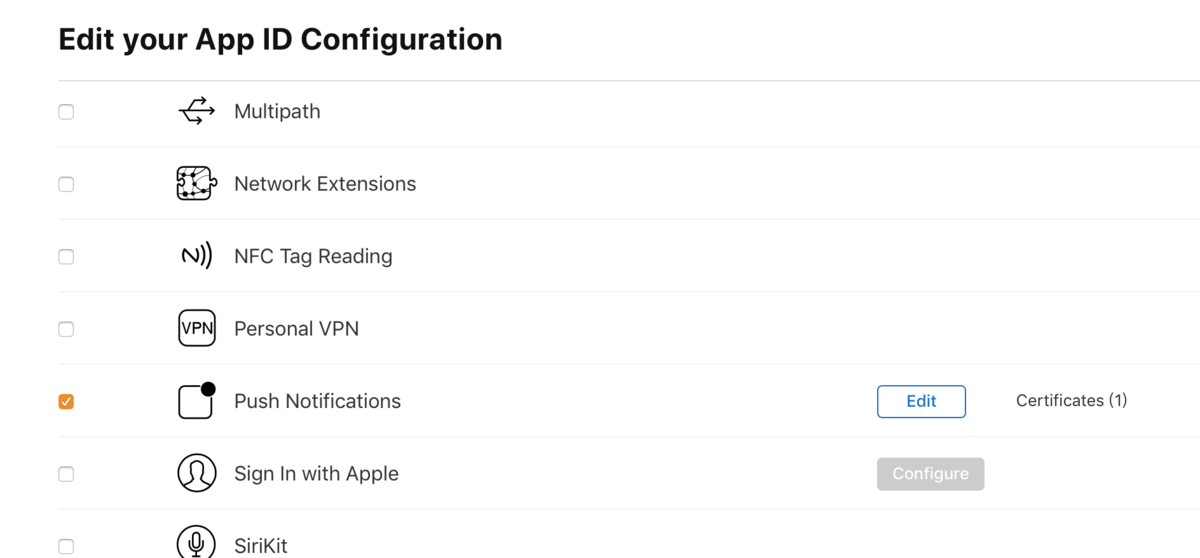
3:如果之前创建了App ID,我们需要为此App ID开启推送
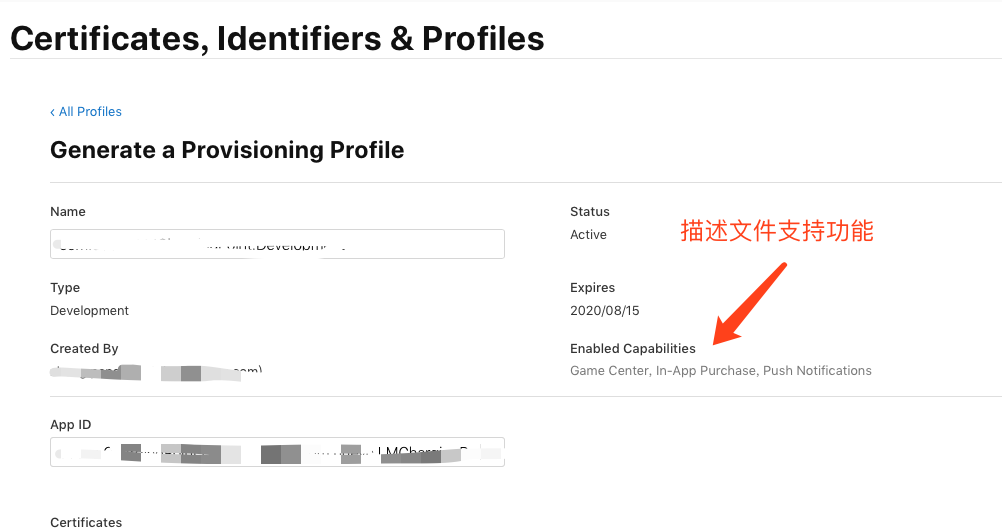
4:如果已经创建描述文件,需要重新保存
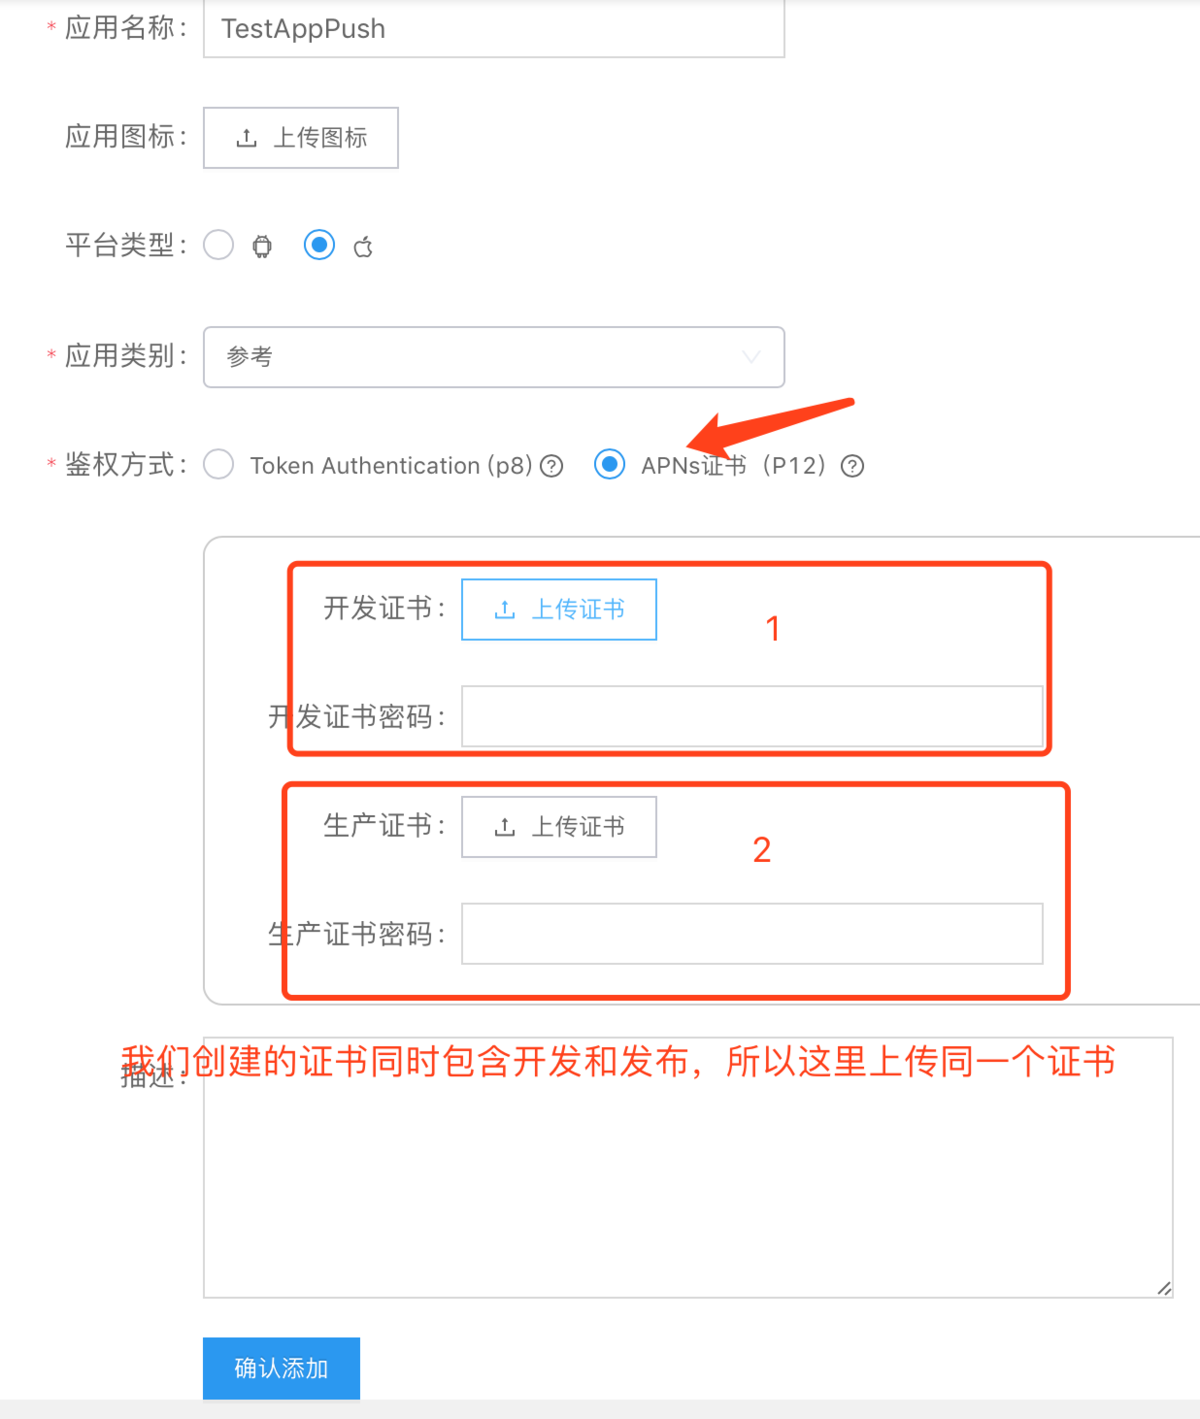
5:使用证书方式推送,我们去友盟为此方式进行配置
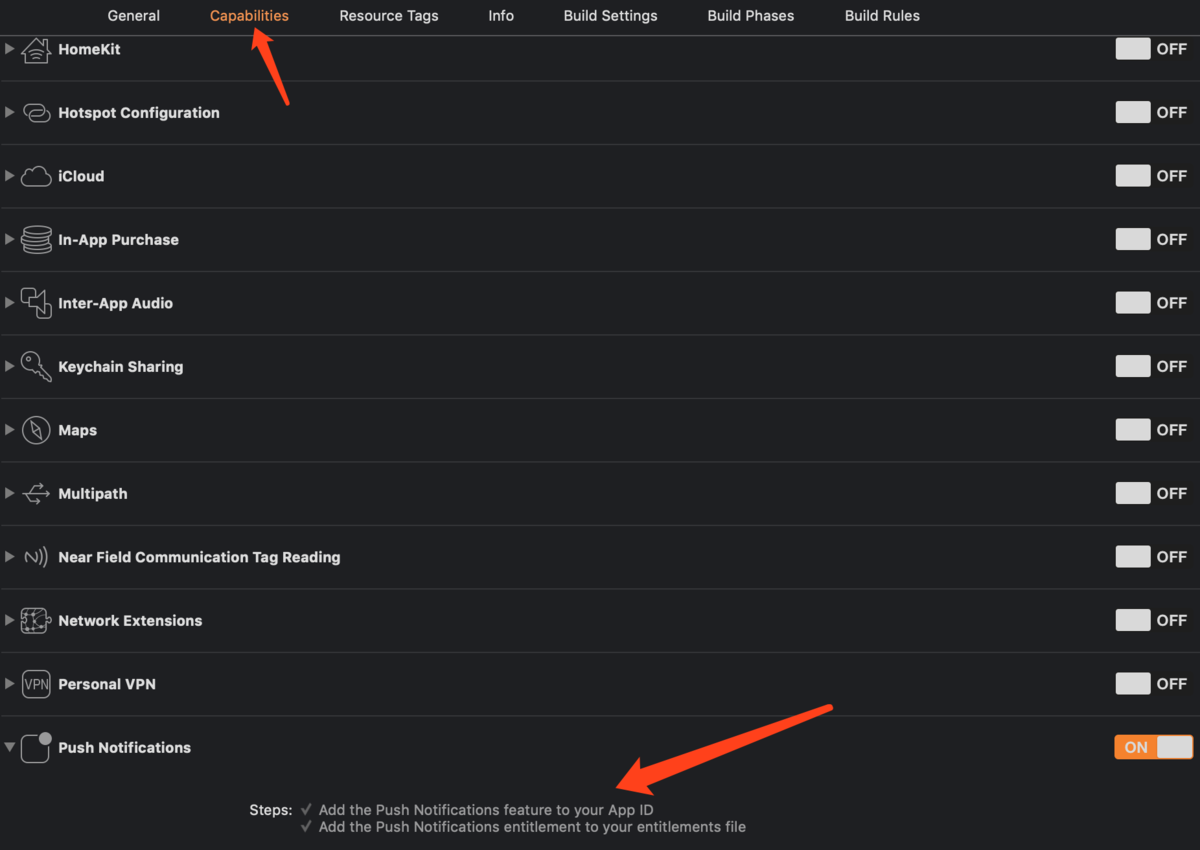
3:设置xcode,开启推送功能 在xcode中为我们的项目打开我们的消息推送功能
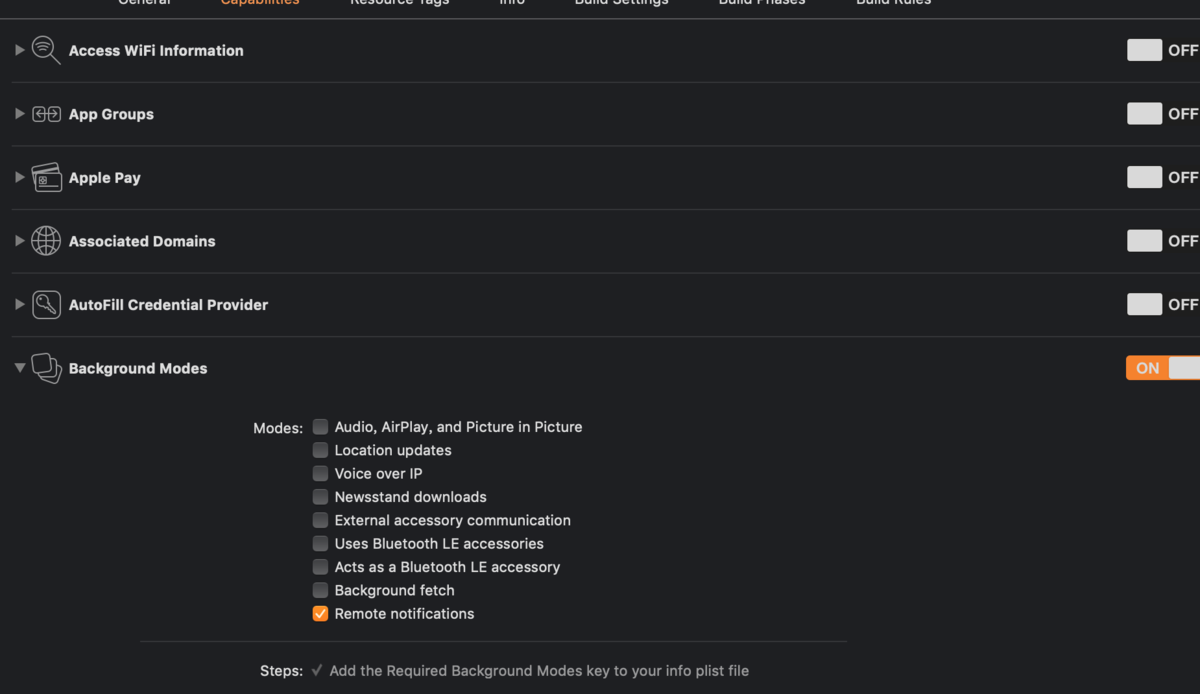
其他消息推送功能也记录下,关于app后台运行的功能
voice over ip 简称voip,需要配置证书,如果你的项目包含语音通话,类似微信语音视频功能,可以选择此项,app处于后台或者杀死app,收到此消息都会唤醒app执行一个方法,审核需要提供呼叫功能演示视频Remote nitifications 静默推送,推送方式类似消息推送,不过不会弹出消息框,app处于后台会被唤醒调用一个方法,我们可以在这个方法中处理一些事情,但是杀掉app就收不到此推送APNS 普通消息推送,app处于后台或者杀死app都能收到,但不会唤醒app调用方法
这里我选择开启后台的静默推送
添加推送的代码,使用友盟推送
1 2 3 4 5 6 7 8 9 10 11 12 13 14 15 16 17 18 19 20 21 22 23 24 25 26 27 28 29 30 31 32 33 34 35 36 37 38 39 40 41 42 43 44 45 46 47 48 49 50 51 52 53 54 55 56 57 58 59 60 61 62 63 64 65 66 67 68 69 70 71 72 73 74 75 76 77 78 79 80 81 82 83 84 85 86 87 88 89 90 91 92 93 94 95 96 97 98 99 UMessageRegisterEntity * entity = [[UMessageRegisterEntity alloc] init]; entity.types = UMessageAuthorizationOptionBadge|UMessageAuthorizationOptionAlert|UMessageAuthorizationOptionSound; if (@available(iOS 10.0 , *)) { UNNotificationAction *action1_ios10 = [UNNotificationAction actionWithIdentifier:@"action1_identifier" title:@"打开应用" options:UNNotificationActionOptionForeground]; UNNotificationAction *action2_ios10 = [UNNotificationAction actionWithIdentifier:@"action2_identifier" title:@"忽略" options:UNNotificationActionOptionForeground]; UNNotificationCategory *category1_ios10 = [UNNotificationCategory categoryWithIdentifier:@"category1" actions:@[action1_ios10, action2_ios10] intentIdentifiers:@[] options:UNNotificationCategoryOptionCustomDismissAction]; NSSet *categories = [NSSet setWithObjects:category1_ios10, nil ]; entity.categories = categories; [UNUserNotificationCenter currentNotificationCenter].delegate = self ; }else { UIMutableUserNotificationAction *action1 = [[UIMutableUserNotificationAction alloc] init]; action1.identifier = @"action1_identifier" ; action1.title=@"打开应用" ; action1.activationMode = UIUserNotificationActivationModeForeground ; UIMutableUserNotificationAction *action2 = [[UIMutableUserNotificationAction alloc] init]; action2.identifier = @"action2_identifier" ; action2.title=@"忽略" ; action2.activationMode = UIUserNotificationActivationModeBackground ; action2.authenticationRequired = YES ; action2.destructive = YES ; UIMutableUserNotificationCategory *actionCategory1 = [[UIMutableUserNotificationCategory alloc] init]; actionCategory1.identifier = @"category1" ; [actionCategory1 setActions:@[action1, action2] forContext:(UIUserNotificationActionContextDefault )]; NSSet *categories = [NSSet setWithObjects:actionCategory1, nil ]; entity.categories = categories; } [UMessage registerForRemoteNotificationsWithLaunchOptions:launchOptions Entity:entity completionHandler:^(BOOL granted, NSError * _Nullable error) { if (granted) { DLog(@"注册消息通知成功" ); }else { } }]; - (void )application:(UIApplication *)application didRegisterForRemoteNotificationsWithDeviceToken:(NSData *)deviceToken { NSLog (@"推送的token %@" ,[[[[deviceToken description] stringByReplacingOccurrencesOfString: @"<" withString: @"" ] stringByReplacingOccurrencesOfString: @">" withString: @"" ] stringByReplacingOccurrencesOfString: @" " withString: @"" ]); [UMessage registerDeviceToken:deviceToken]; } - (void )application:(UIApplication *)application didReceiveRemoteNotification:(NSDictionary *)userInfo { DLog(@"推送消息 didReceiveRemoteNotification" ) } -(void )application:(UIApplication *)application didReceiveRemoteNotification:(NSDictionary *)userInfo fetchCompletionHandler:(void (^)(UIBackgroundFetchResult ))completionHandler { [UMessage setAutoAlert:NO ]; DLog(@"推送消息 didReceiveRemoteNotification fetchCompletionHandler" ); if ([[[UIDevice currentDevice] systemVersion] intValue] < 10 ){ [UMessage didReceiveRemoteNotification:userInfo]; } completionHandler(UIBackgroundFetchResultNewData ); } -(void )userNotificationCenter:(UNUserNotificationCenter *)center willPresentNotification:(UNNotification *)notification withCompletionHandler:(void (^)(UNNotificationPresentationOptions))completionHandler API_AVAILABLE(ios(10.0 )){ NSDictionary * userInfo = notification.request.content.userInfo; if ([notification.request.trigger isKindOfClass:[UNPushNotificationTrigger class ]]) { [UMessage setAutoAlert:NO ]; [UMessage didReceiveRemoteNotification:userInfo]; }else { } DLog(@"推送消息 userNotificationCenter willPresentNotification" ); completionHandler(UNNotificationPresentationOptionSound|UNNotificationPresentationOptionBadge|UNNotificationPresentationOptionAlert); } -(void )userNotificationCenter:(UNUserNotificationCenter *)center didReceiveNotificationResponse:(UNNotificationResponse *)response withCompletionHandler:(void (^)(void ))completionHandler API_AVAILABLE(ios(10.0 )){ NSDictionary * userInfo = response.notification.request.content.userInfo; if (@available(iOS 10.0 , *)) { if ([response.notification.request.trigger isKindOfClass:[UNPushNotificationTrigger class ]]) { [UMessage didReceiveRemoteNotification:userInfo]; }else { } } else { } DLog(@"推送消息 userNotificationCenter didReceiveNotificationResponse" ); }
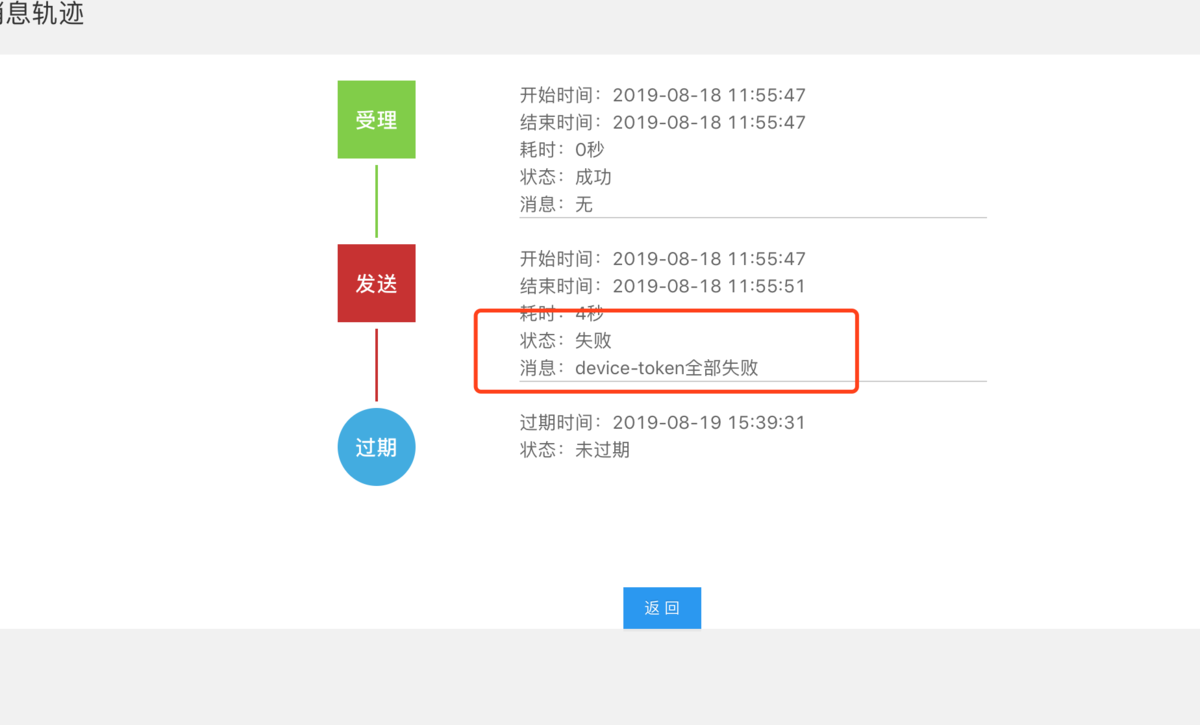
4:遇到的坑,关于使用友盟推送遇到的问题记录 使用友盟推送时,当我们使用development证书调试时,无法收到推送的消息,推送失败如下device-token全部失败
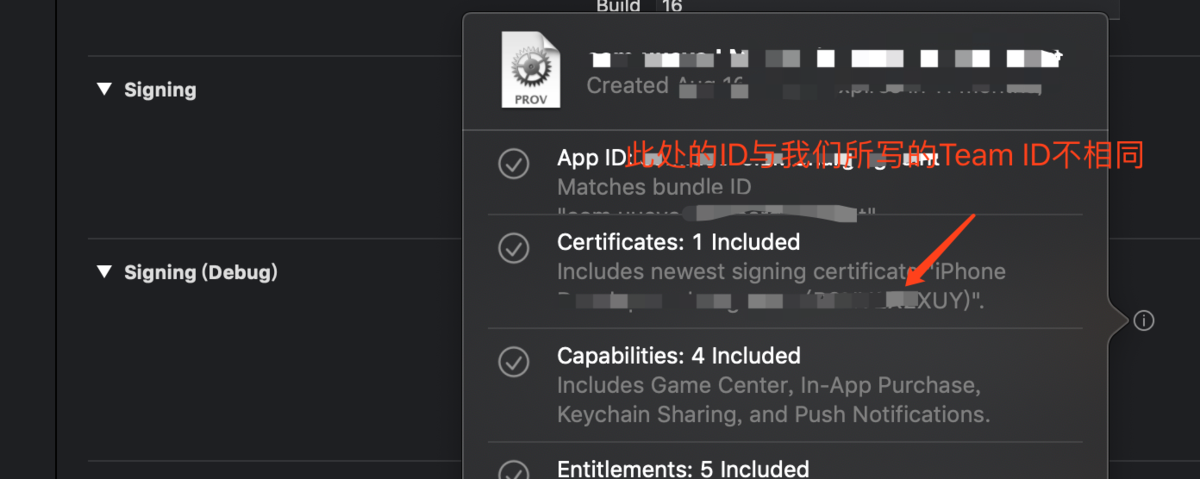
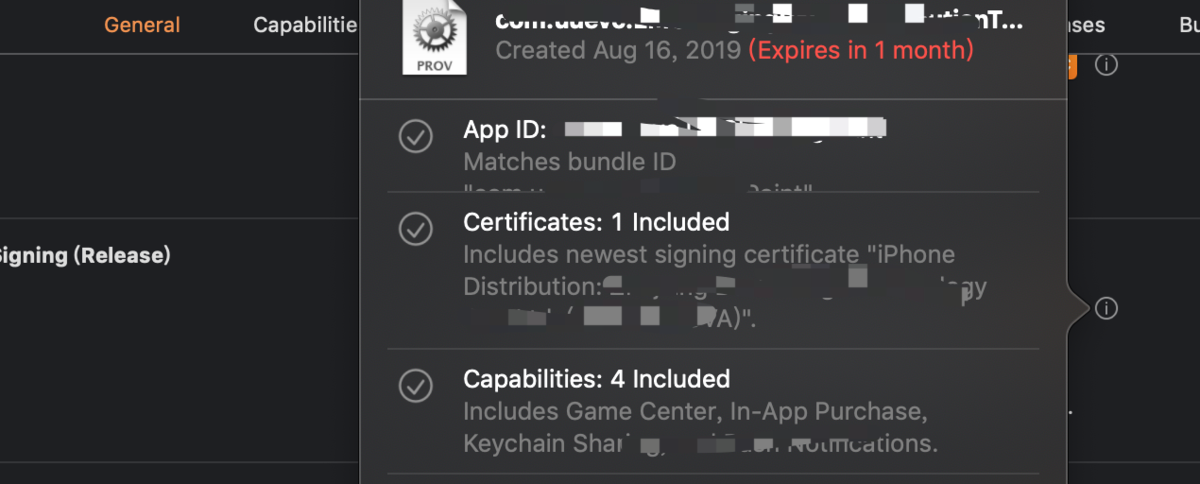
我们可以发现下图中,debug下选择的development证书的ID与TeamID不相同
development
我们看看release下选择的distribution证书ID和TeamID是相同的
distribution
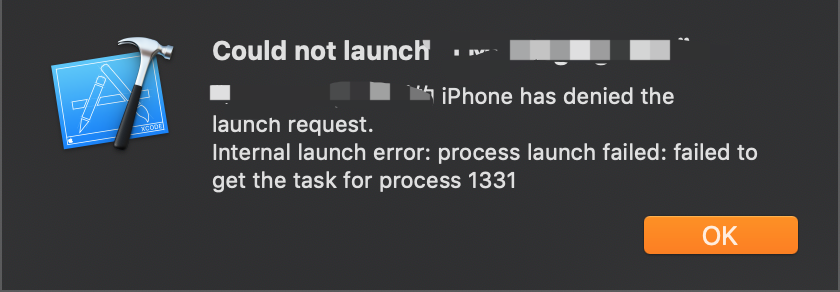
尝试在debug下使用distribution证书,真机无法运行起来
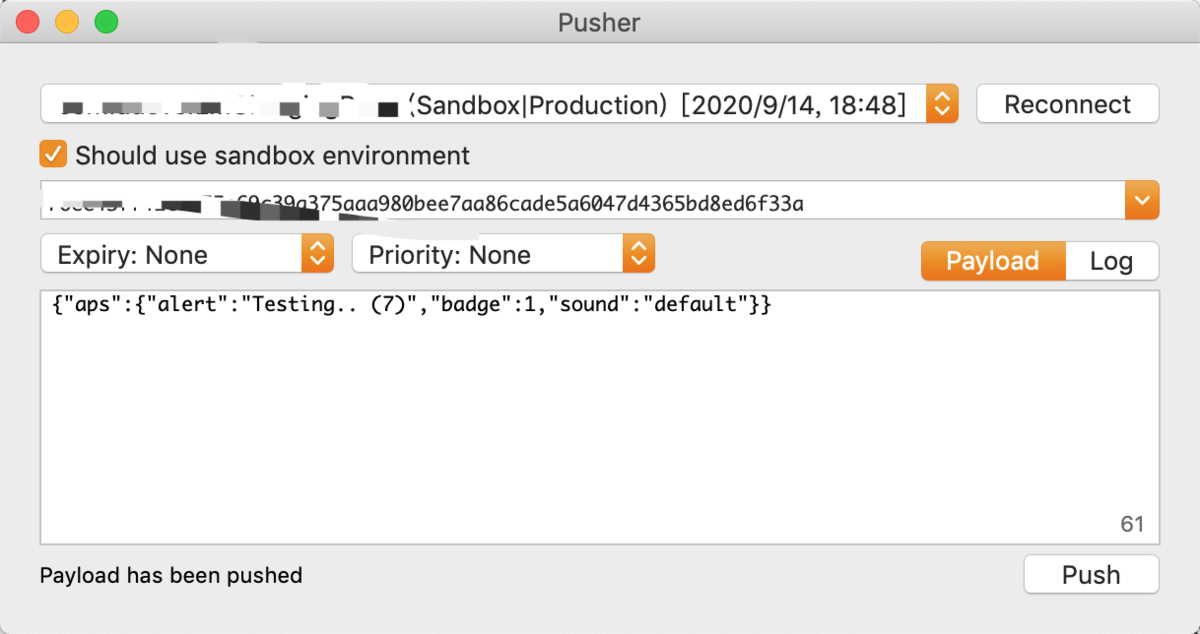
解决办法1:将程序打包成Ad hoc安装,这样就可以收到消息推送 解决办法2:使用测试消息推送的工具,比如Pusher,测试工具需要选择证书推送的情况下才能使用
5:记录下消息推送的格式 iOS10之前的格式
1
2
3
4
5
6
7
8
{ "aps" : { "alert" : "内容" , "badge" : 1 , "sound" : "default" , "userinfo" : { "username" : "tom" } } }
iOS 10及之后(iOS7、iOS8、iOS9可通用此模板)
1
2
3
4
5
6
7
8
9
10
11
12
13
14
15
16
{ "aps" : { "alert" : { "title" : "标题" , "subtitle" : "子标题" , "body" : "内容" } , "badge" : 1 , "sound" : "default" , "userinfo" : { "playid" : "123" , "username" : "tom" , "sex" : 1 } } }
 点击keys旁边的添加,然后我们勾选图中的选择,点击continue
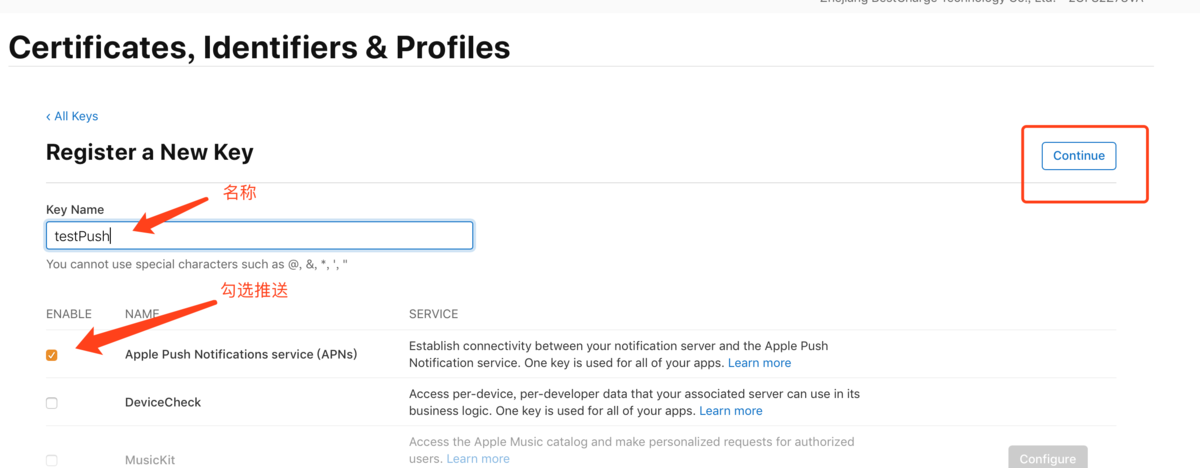

 选择刚刚创建的CA证书
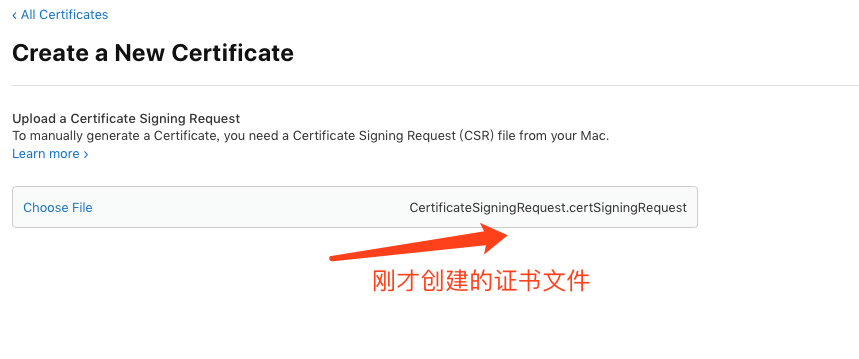
 导出.p12文件备用